
Debugging is the most tricky and challenging part of the software development process. Some bugs or problems are really hard to find because of a combination of different technologies, making it hard to find the root cause of the problem. For example, if you want to load a sequence of records from the database in reactive programming style: think of all the layers/abstractions you can have between the caller and the result; Rx, Threads, LINQ, EF, EF-Provider, .NET, SQL Server engine, Windows, etc. If any problem happened while acquiring the data, in most cases, it is easy to figure out the problem, but sometimes investigating the issue is very hard and costs a lot of time, money, and requires expertise.
In this article, I have described the magical debugging tool OzCode, which helps you debug complex applications, and can save a lot of investigation time. You might also need a good tracing/logging tool and a good design/strategy for error handling, and remember: the tools alone cannot help you to solve the complex problems.
Now let’s get started:
Prerequisites
Download and Install the visual studio preview version.
https://visualstudio.microsoft.com/vs/preview/
Note: I have tested with VS 2019 Preview and VS 2017
Downloading and Installing the OzCode:
https://oz-code.com/download
Visual Studio 2019
I love VS2019. A lot of enhancements everywhere! My favorite new feature is the text search in the Watch Window.
![]() The new search textbox
The new search textbox
![]() The search depth: The scan depth of the search-algorithm in the object graph
The search depth: The scan depth of the search-algorithm in the object graph
![]() The result windows
The result windows
The excellent news this feature already exists in OzCode for the past couple of years, and is even more useful: not only can you use it to do advanced searches – you can also filter the results, and it is also significantly faster. OzCode is an interactive debugging tool which helps you at the runtime to find and fix the bugs.
The figure below shows the Free Text search in OzCode.
![]() The text to be searched = “Customer”
The text to be searched = “Customer”
![]() Founded items
Founded items
![]() Search depth
Search depth
I have used OzCode, and I want to share my experience with it, and knowledge about it.
OzCode
Exception handling
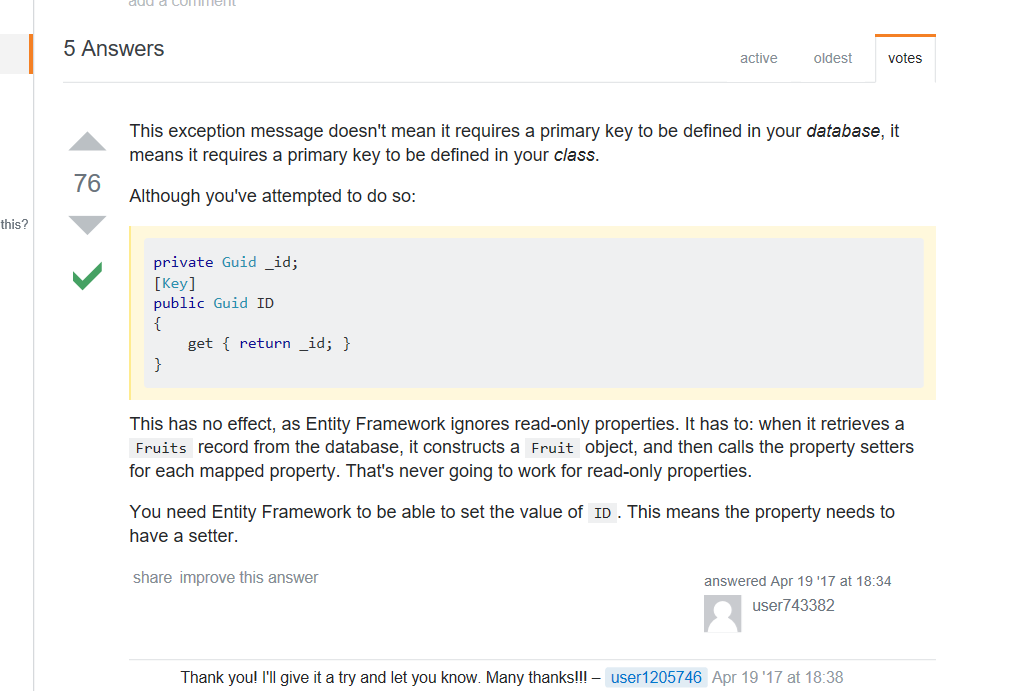
If you are a programmer, then you know that the root exception is not always clear. When an exception happens in your method and if it is not caught, then the code flow will be stopped and redirected (exit) from the current method to the previous. This technique is known as exception propagation. Again, exception propagation is a process in which the exception is dropped from to the top to the bottom of the calling stack and into the calling chain is not handled there, the exception again drops down to the previous method, and so on until it gets caught or until it reaches the very bottom of the call stack. If the exception remains uncaught even after reaching the bottom of the stack, then the application is terminated.
In many cases, these exceptions are handled, aggregated, redirected or converted to another kind of exception (and then rethrown), attaching the original exception in an InnerException, in the best-case scenario.
OzCode allows a quick move to inner exceptions and predicting exceptions before they happened and it helping you find the root problem in a very gentle and modern way.
To demonstrate that, I have created a demo application in GitHub to test OzCode, and while developing the demo application, I have got my first exception as shown below.
Source Code:
https://github.com/alugili/Advanced-Debugging-Visual-Studio-OzCode
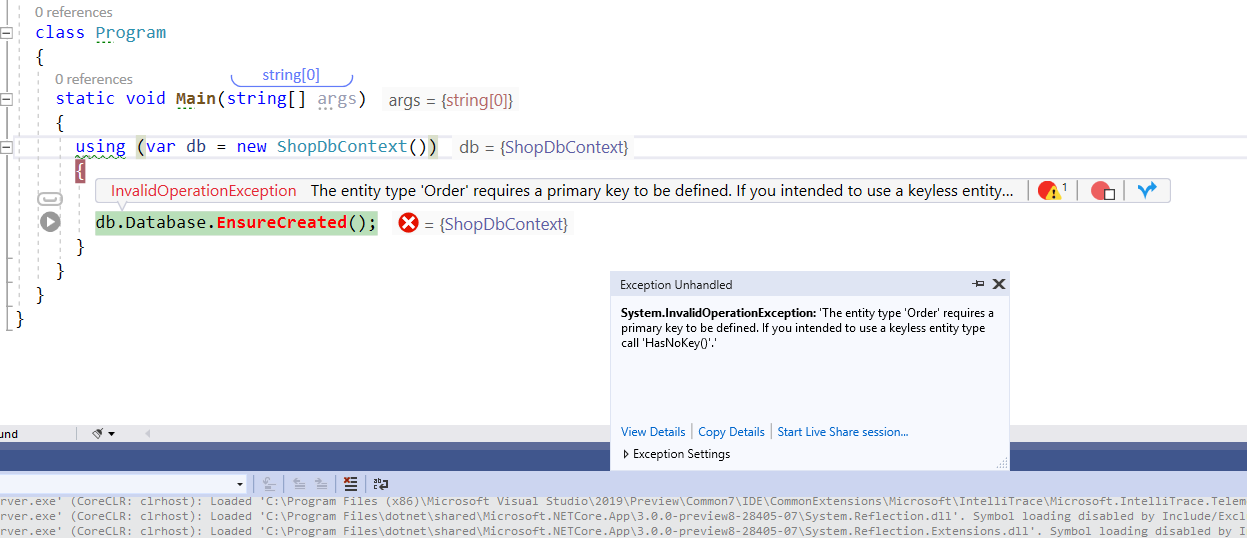
As you see above in the icon ![]() that was one exception (not nested/aggregated). Moreover, I have clicked on the exception icon. Then the below Window will appear.
that was one exception (not nested/aggregated). Moreover, I have clicked on the exception icon. Then the below Window will appear.
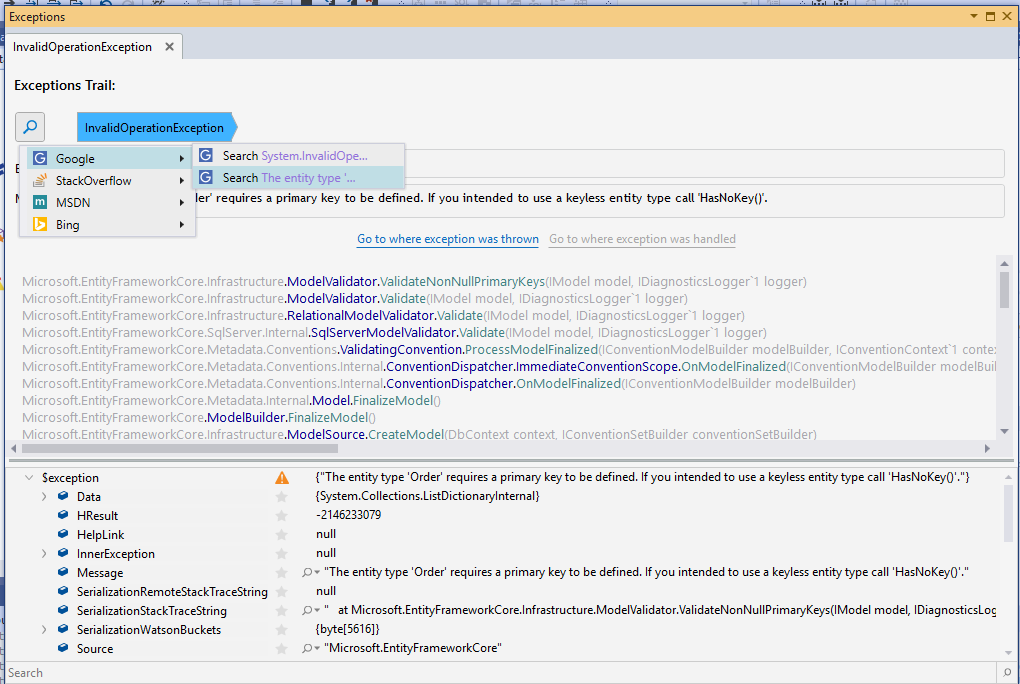
As shown above, I have searched for the solution in the google without copy or paste anything.
I have taken the first google website.
Amazing! I recognize what the problem is and how can I solve it with three mouse clicks!
I have tested with many different problems, and I can see the root exceptions very quickly.
Advanced Debugging
Finding specific information in the Visual Studio Debug Windows (Watch Window) is one of the most common problems that we have faced in the past. My workaround for the problem was: I have copied and pasted the debugger-results to Excel or Notepad++ and searched the desired information in Excel/Notepad++, then OzCode made my life easy – let’s see how everything works.
I have created a mini shop application for this demo and seeded it with some data. I have used .NET Core/ EF Core /SQL Server.
I have posted down the POCO classes and the data seeding, to help you understand the data structures.
public class Product
{
  public int ProductId { get; set; }

  public string Name { get; set; } = string.Empty;

  public string Description { get; set; } = string.Empty;

  public double Price { get; set; }
}

public class Admin
{
  public int AdminId { get; set; }

  public string Name { get; set; } = string.Empty;
}

public class Customer
{
  public int CustomerId { get; set; }

  public string Name { get; set; } = string.Empty;

  public ICollection<Order> Orders { get; set; } = new Collection<Order>();
}

public class Order
{
  public int OrderId { get; set; }

  public int Quantity { get; set; }

  public Customer Customer { get; set; } = new Customer();

  public Product Product { get; set; } = new Product();
}

public class Shop
{
  public int ShopId { get; set; }

  public ICollection<Admin> Admins { get; set; } = new Collection<Admin>();

  public ICollection<Customer> Customers { get; set; } = new Collection<Customer>();

  public ICollection<Product> Products { get; set; } = new Collection<Product>();
}
I have seeded my shop – database as following:
public class DatabaseSeeding
  {
    public void CreateAndSeed()
    {
      using (var dbContext = new ShopDbContext())
      {
        // Generating the database
        dbContext.Database.EnsureDeleted();
        dbContext.Database.EnsureCreated();

        // Adding Products
        const int productCount = 30;
        var products = new Product[productCount];
        for (var i = 0; i < productCount; i++)
        {
          var product = new Product { Description = $"Description {i}", Name = $"Product Name {i}", Price = i };
          dbContext.Products.Add(product);
          products[i] = product;
          // Store inside the loop to simulate a sequential data storing.
          dbContext.SaveChanges();
        }

        var admin = new Admin { Name = "Admin" };

        var customer1 = new Customer { Name = "Customer 1" };
        var customer2 = new Customer { Name = "Customer 2" };
        var customer3 = new Customer { Name = "Customer 3" };

        // Adding Customers
        dbContext.Customers.Add(customer1);
        dbContext.Customers.Add(customer2);
        dbContext.Customers.Add(customer3);
        dbContext.Admins.Add(admin);
        dbContext.SaveChanges();

        // Adding Shop
        var shop = new Shop { Products = products };
        shop.Customers.Add(customer1);
        shop.Customers.Add(customer2);
        shop.Customers.Add(customer3);
        shop.Admins.Add(admin);

        dbContext.Shops.Add(shop);
        dbContext.SaveChanges();

        for (var i = 0; i < 10; i++)
        {
          var order = new Order { Product = products[i], Customer = customer1, Quantity = 1 };
          dbContext.Orders.Add(order);
          // Store inside the loop to simulate a sequential data storing.
          dbContext.SaveChanges();
        }

        for (var i = 10; i < 20; i++)
        {
          var order = new Order { Product = products[i], Customer = customer2, Quantity = 2 };
          dbContext.Orders.Add(order);
          // Store inside the loop to simulate a sequential data storing.
          dbContext.SaveChanges();
        }

        for (var i = 20; i < productCount; i++)
        {
          var order = new Order { Product = products[i], Customer = customer3, Quantity = 3 };
          dbContext.Orders.Add(order);
          // Store inside the loop to simulate a sequential data storing.
          dbContext.SaveChanges();
        }
      }
    }
  }
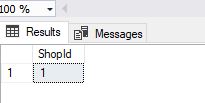
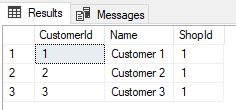
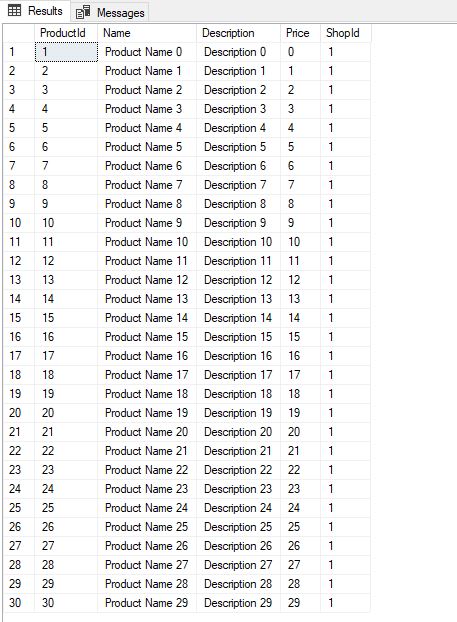
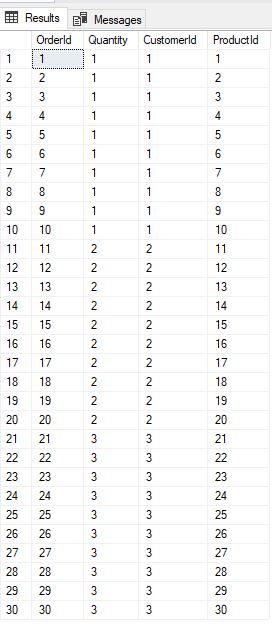
Shop Database
Shop Table
Customers Table

Products Table
Orders Table
My first Query
I have made a complex query: flatting all orders, taking only the orders that have a Quantity between two and three, then skipping two orders and then taking five orders.
private static void FiveOrders()
    {
      using (var dbContext = new ShopDbContext())
      {
        var shopQuery = dbContext.Shops.Include(x => x.Products)
          .Include(x => x.Admins)
          .Include(x => x.Customers)
          .ThenInclude(x => x.Orders);

        var firstOrders = shopQuery
          .SelectMany(c => c.Customers)
          .SelectMany(o => o.Orders)
          .Where(s => s.Quantity > 1)
          .Skip(2)
          .Take(15)
          .OrderByDescending(x => x.OrderId);

        foreach (var order in firstOrders)
        {
          Console.WriteLine(order);
        }
      }
    }
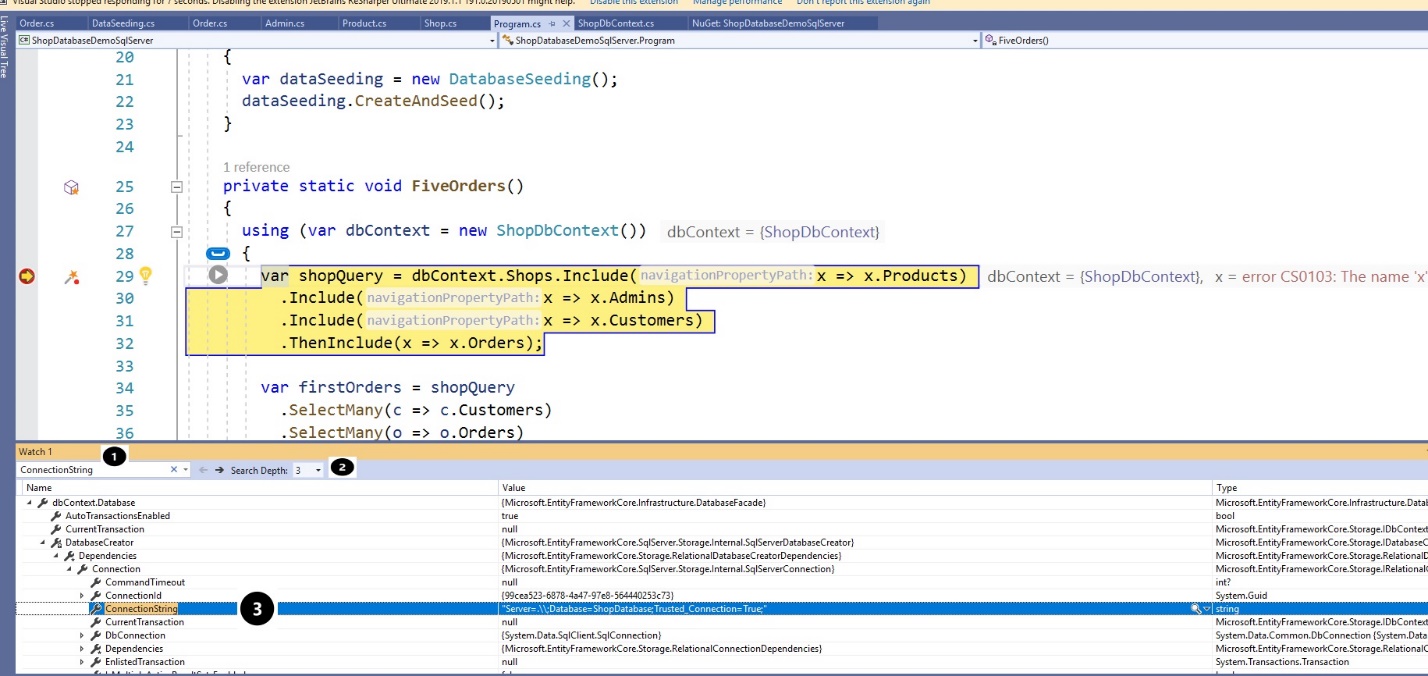
I have put a breakpoint on the query and starting the application. If you look at the breakpoint ![]() , you can see everywhere the question mark icons that because the query is still now not evaluated (IQueryable).
, you can see everywhere the question mark icons that because the query is still now not evaluated (IQueryable).
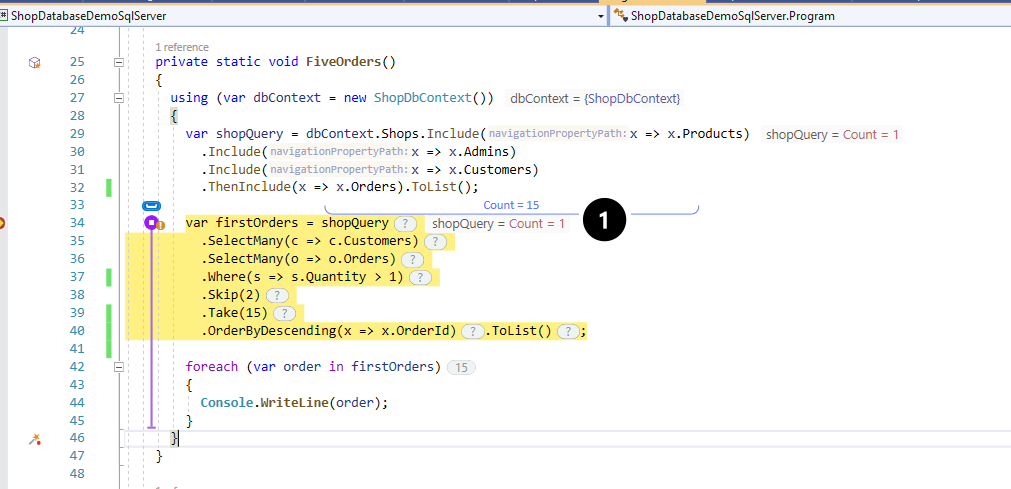
Nothing unusual until now, but how can you evaluate and investigate an IQueryable? to do that, I have added ToList() to execute the shop query as shown below:
As you see, something magical is happening. ToList() has loaded all entries from the database (!Do not check in this trick in the production code! This kills your application performance), and with this trick, I can evaluate the query in memory so that I can debug it step by step and watch the data flow:
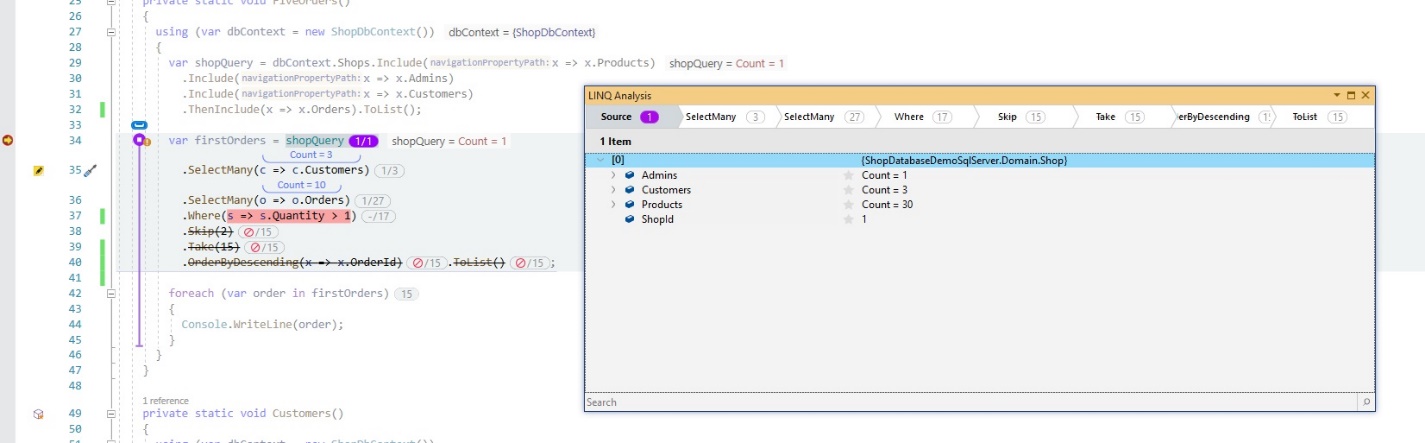
I have clicked on 1/1 icon ![]() then OzCode Debug Window is opened as shown above
then OzCode Debug Window is opened as shown above ![]() .
.
Count = 3 ![]() shows how many customers contain the Customers collection.
shows how many customers contain the Customers collection.
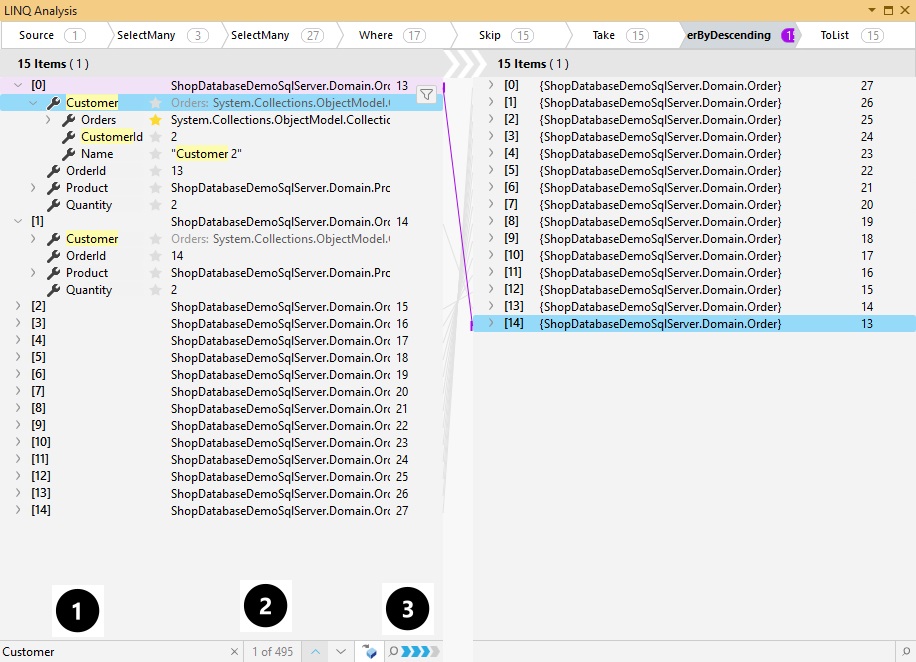
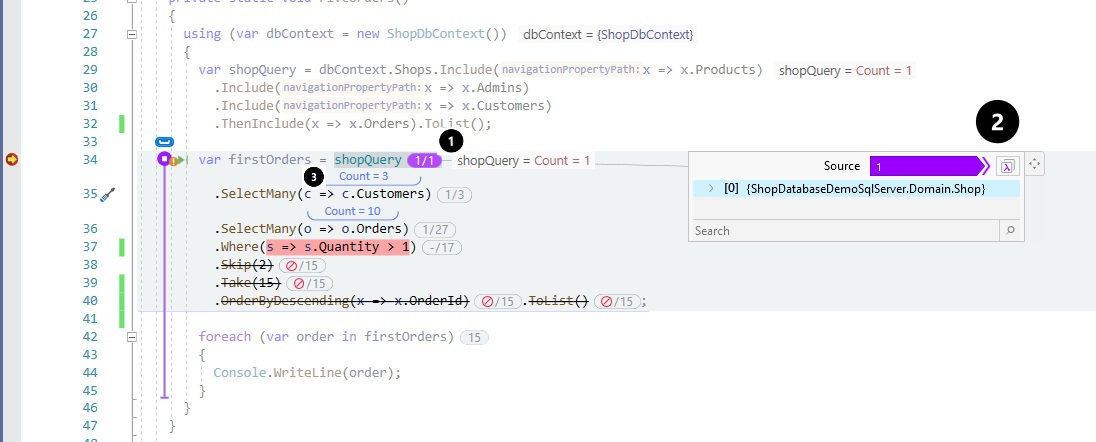
I have clicked on the lambda icon (  ) To open the LINQ analysis window. Now we can see the LINQ query in a graphical style. Once you understand how this works, it can save you a lot of time and help you debug even the most complex LINQ queries.
As shown below, I have clicked on SelectMany( ![]() ) and then opened the Customer Collection(
) and then opened the Customer Collection( ![]() ).
).
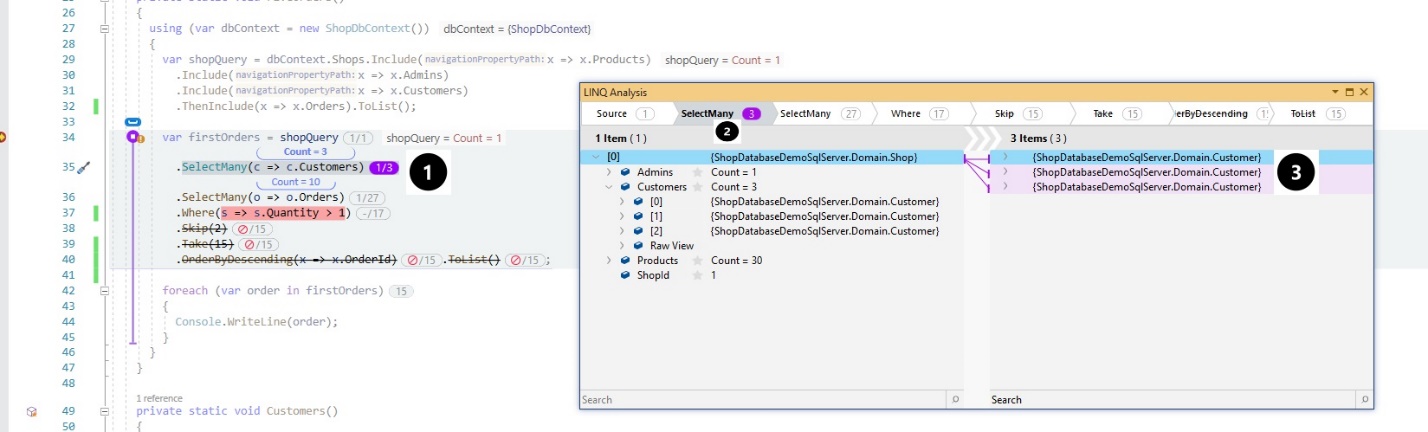
The left Window ( ![]() ) show the customer-collection before executing SelectMany(), and the right Window (
) show the customer-collection before executing SelectMany(), and the right Window ( ![]() ) is showing the result of SelectMany().
) is showing the result of SelectMany().
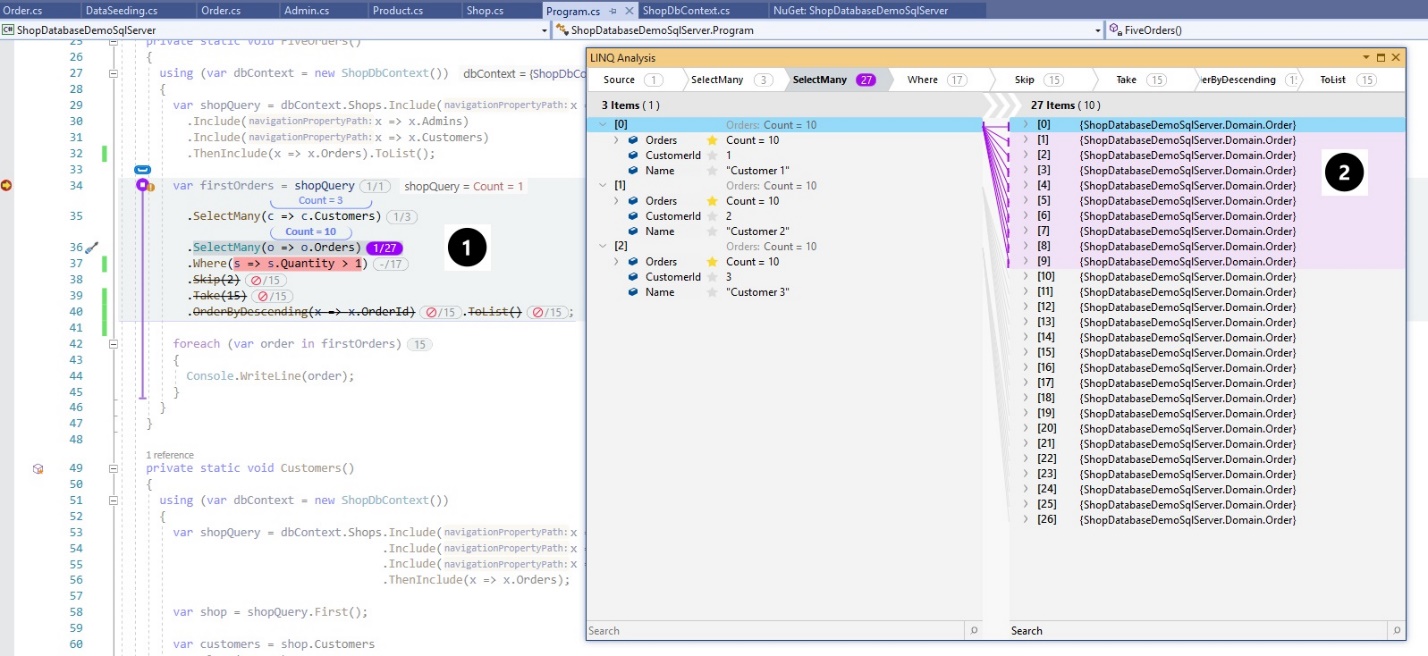
As shown above, I have selected the second SelectMany( ![]() ), and then I have chosen the first customer. As you see in the right Window, the Orders (light pink colored
), and then I have chosen the first customer. As you see in the right Window, the Orders (light pink colored ![]() ) belong to the first customer (with CustomerId equal 1).
) belong to the first customer (with CustomerId equal 1).
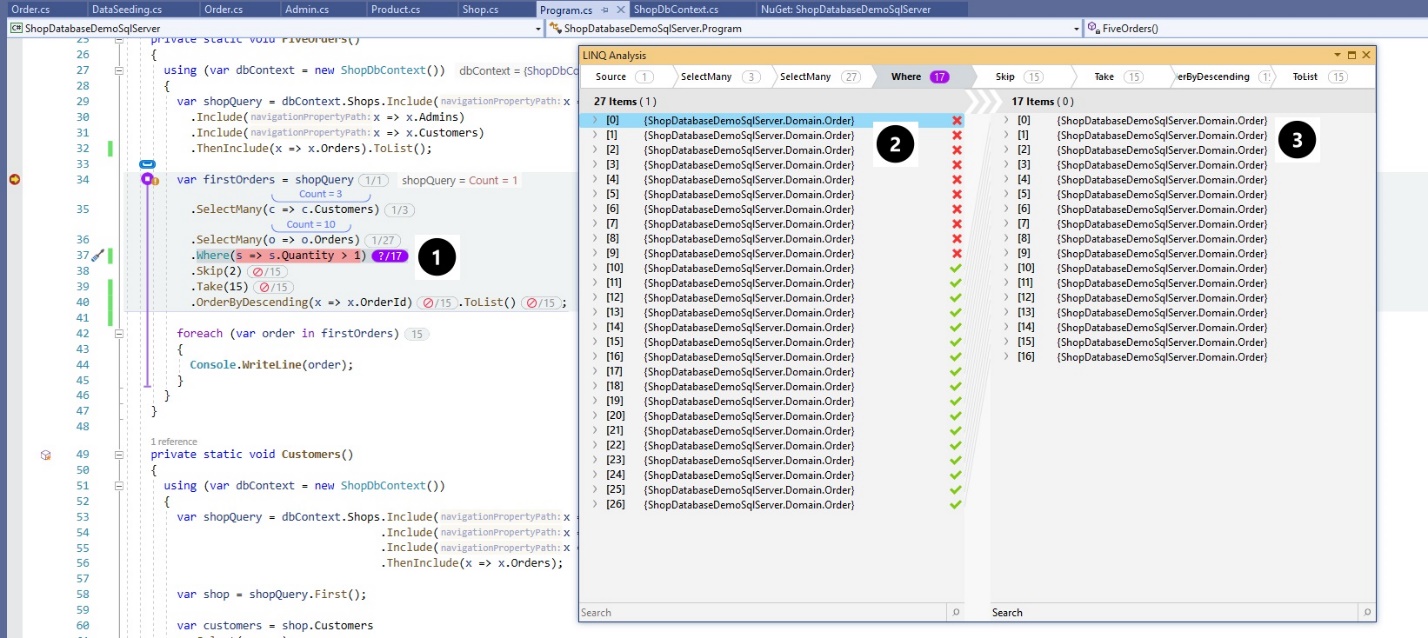
I have clicked on the Where-Clause ![]() in the left Window. Now, you can see in the left Window, which items are excluded from the Where-Clause
in the left Window. Now, you can see in the left Window, which items are excluded from the Where-Clause ![]() and in the right Window
and in the right Window ![]() you can see the result after executing the Where-Clause.
you can see the result after executing the Where-Clause.
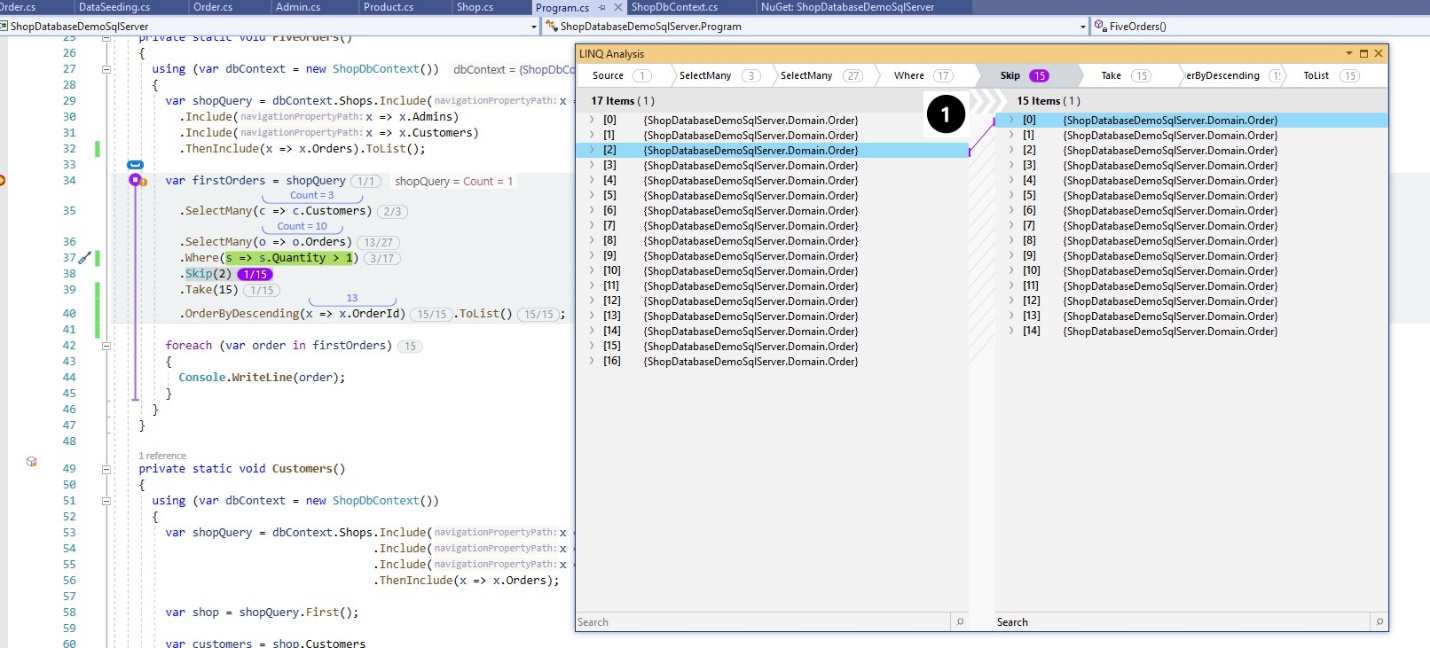
The Skip before and after executing is shown above ![]() (Maroon line).
(Maroon line).
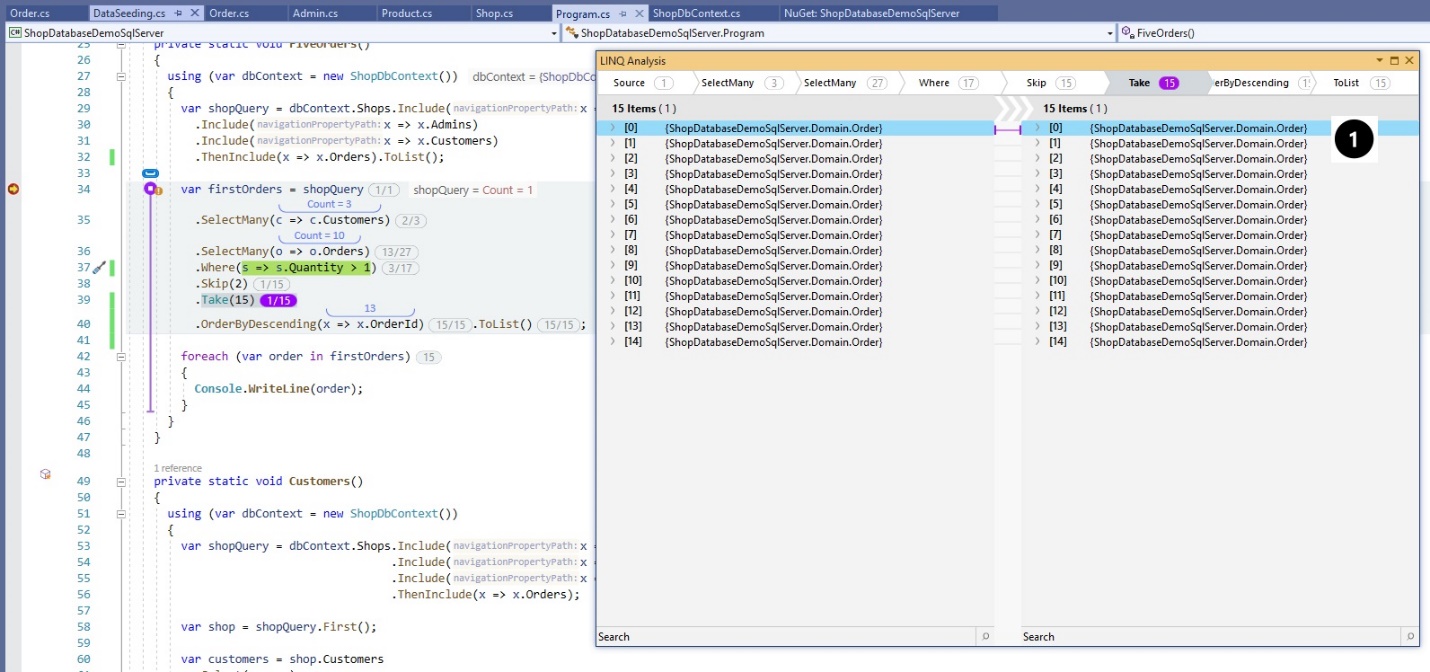
Above is the Take operation ![]() .
.
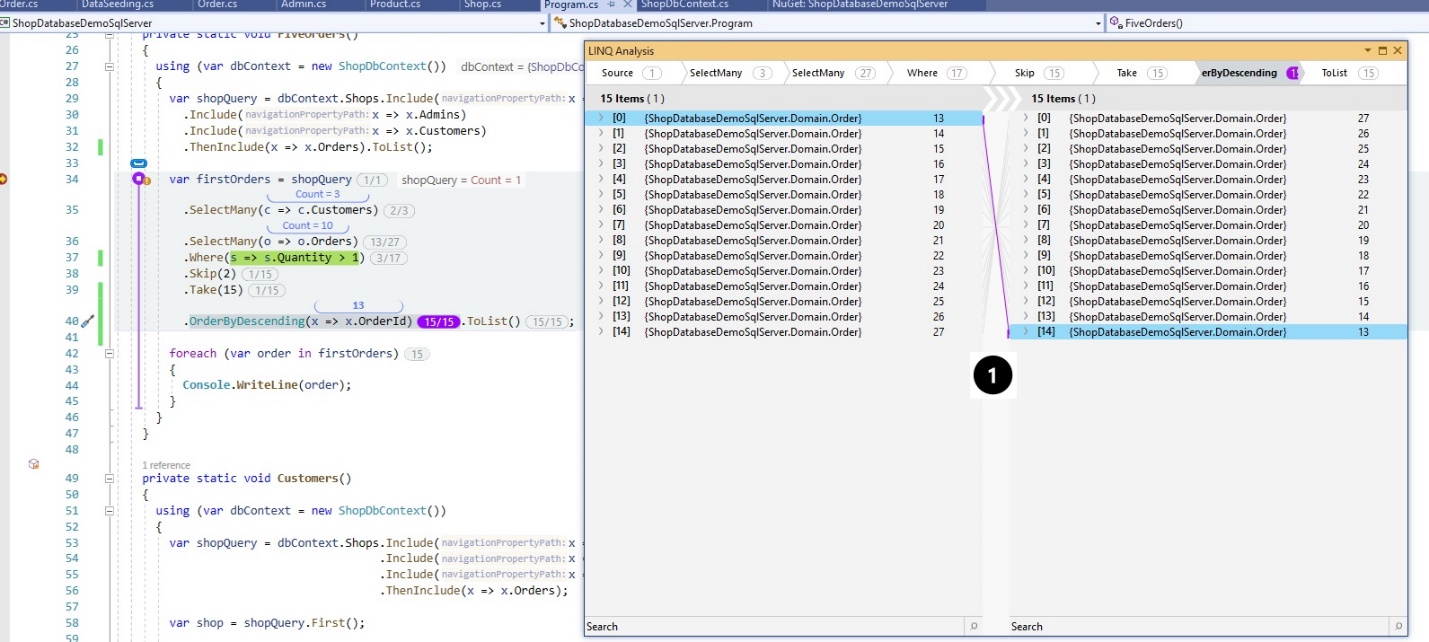
Finally, The OrderBy Desc operation ![]() . Look to the lines above, WOW!
. Look to the lines above, WOW!
Trace
As I told you before, to make a good, successful application that works, you need an excellent debugging and tracing tool too. When one developer lost a few hours because of missing searching/filtering/sorting functionality in their tracing tool, this might cost the same as a yearly subscription for an excellent tracing tool with filters and search- that could have saved that time (If you are saving money in the developers tools, then you are trying to save money in the wrong place!)
OzCode offers a smart tracing technique which can help you trace the multi-threading application and other use cases very well. I also like the SmartInspect.
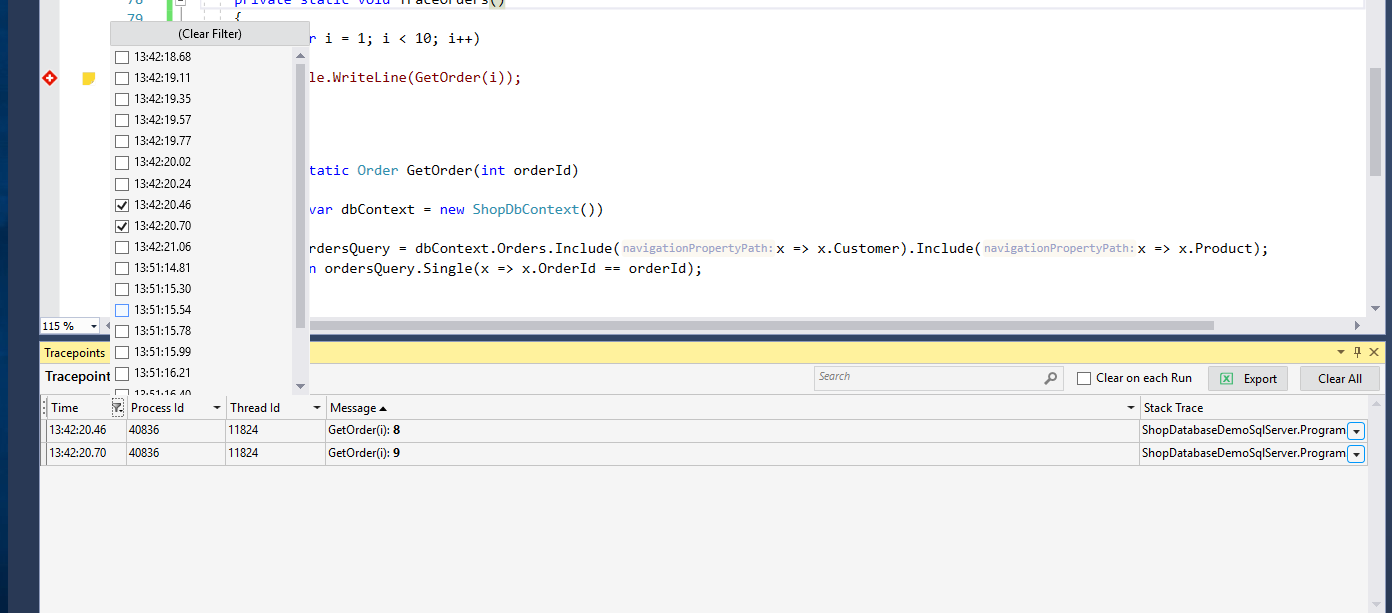
I have added a Trace Point at the line 5.
private static void TraceOrders()
   {
     for (var i = 1; i < 10; i++)
     {
       Console.WriteLine(GetOrder(i));
     }
   }

   private static Order GetOrder(int orderId)
   {
     using (var dbContext = new ShopDbContext())
     {
       var ordersQuery = dbContext.Orders.Include(x => x.Customer).Include(x => x.Product);
       return ordersQuery.Single(x => x.OrderId == orderId);
     }
   }
I have modified the Expression, as shown below.

I have executed the code, and you can see the Order Id.
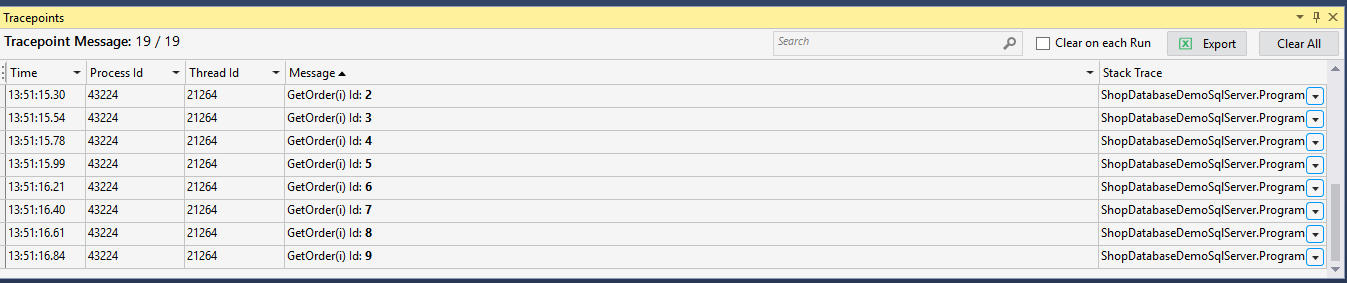
You can also set a filter, for example, a filter on the Time, see below.
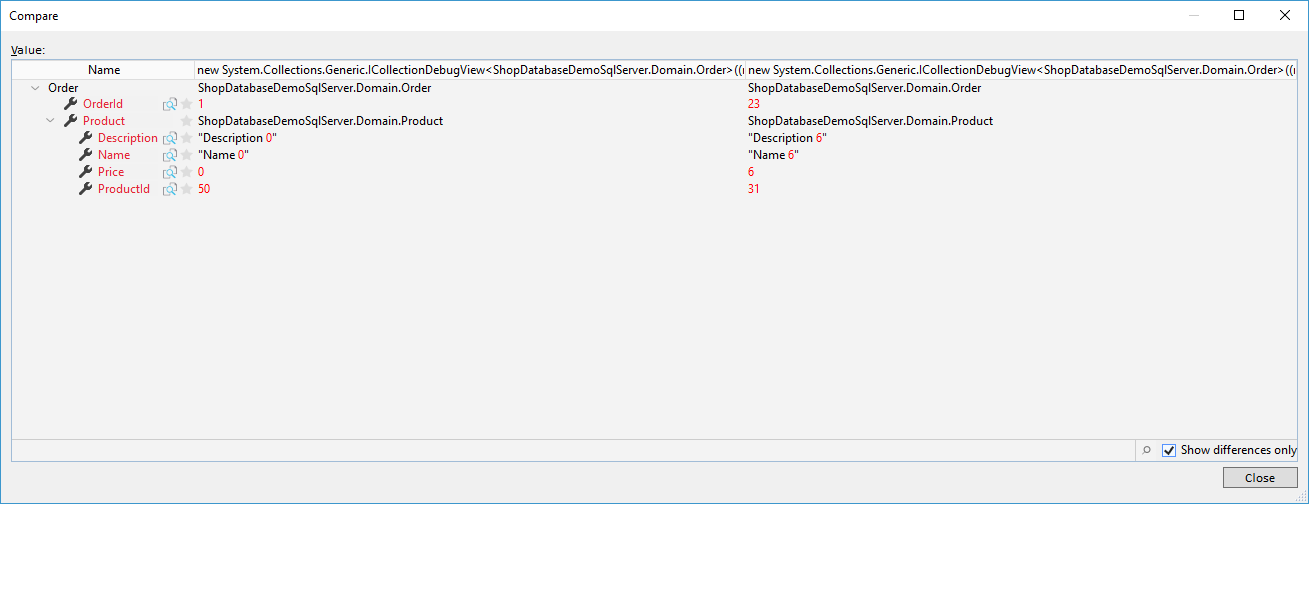
Compare Objects on Graph Objects
You can compare two objects or collection as follows.
In the Customers query, select the first Order from the Query.
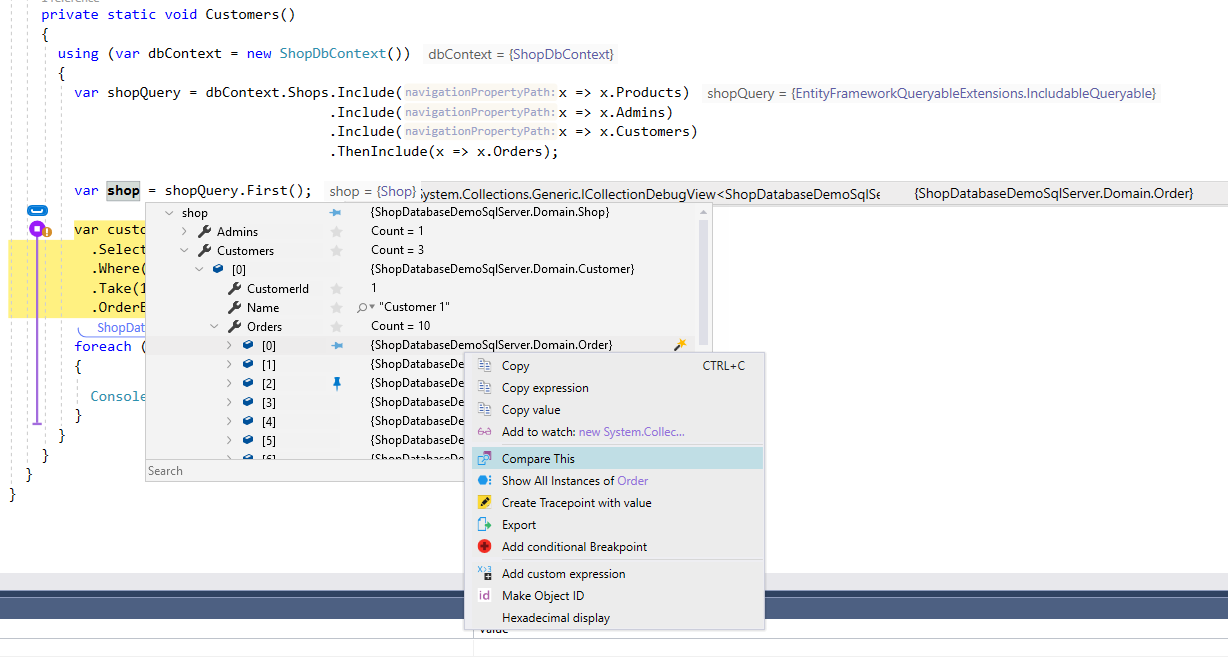
Then select the second object from the collection (any other Order).
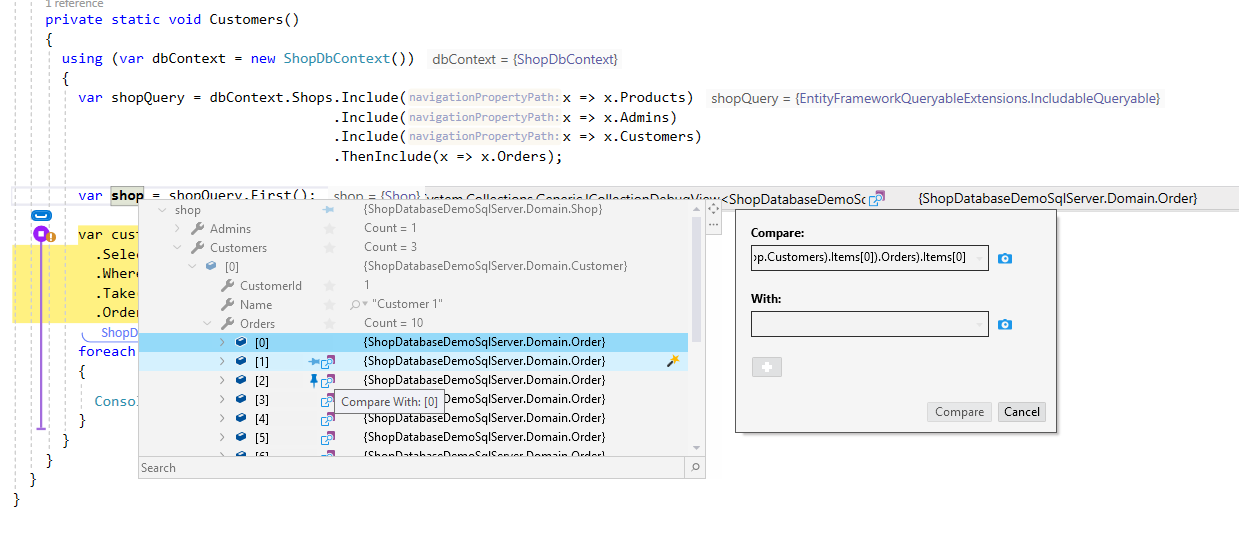
The result: The differences are shown in Compare Window.
Summary
Visual Studio 2019 has many new debug enhancements (https://docs.microsoft.com/fr-fr/visualstudio/ide/whats-new-visual-studio-2019?view=vs-2019), and OzCode is complementary to VS2019 debugging tools which makes the debugging process more comfortable and save a lot of developers time.
OzCode has a lot of more exciting features which I did not mention in this article. The next article is depending on your comments.
I can write about:
- More OzCode features
- Debugging with WinDbg
- Cloud Debugging
Thank you! I appreciate you for reading my article.
1,586 thoughts on “Advanced Debugging with Visual Studio 2019 and OzCode”